Intro
This post describes one approach to multi-tenancy with NestJS using Postgres Row Level Security (RLS). First, you’ll read about the necessary Postgres configuration steps. Second, the extraction of the tenant from a request is explained with code snippets and examples.
The full project ist available here at Github
First things first: What is multi-tenancy?
Multi-tenancy is an approach of splitting a SaaS product virtually into tenants. Thus, one instance of the SaaS can serve multiple customers without any interference of their individual data.
There are different approaches to multi-tenancy when using relational databases. Multi-Schema, Multi-Database, Row Level Security: They all come with their own pitfalls. Some weeks ago, I started to implement multi-tenancy in NestJS using Postgres' RLS feature. In my team, we decided to go with RLS instead of multi-schema/database as it simplifies the database migration as well as the tenant onboarding process on runtime.
What’s the theory?
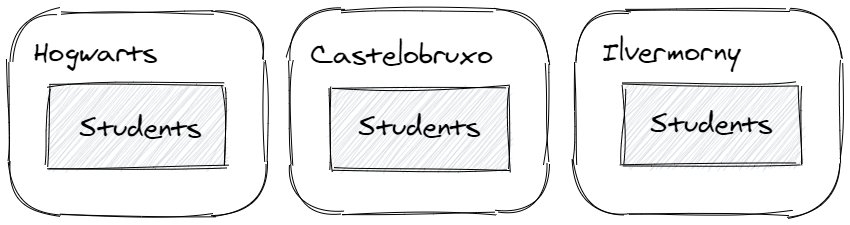
For the hands-on experience, we’re implementing a simple fictional SaaS called Wizreg. Its task is to keep information about the students of various wizarding schools seperate.
Each school has a its own students:
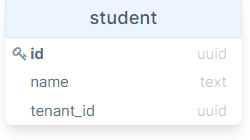
Therefore, we need to have some way to differentiate between the schools in the database. That is where RLS comes into play. Each dataset has a unique identifier describing the corresponding school. Let’s give that id a name: tenant_id.
That’s it for the theory. Straight forward, isn’t it?
The enforcer: Postgres RLS
Before diving into the coding part, we need some information on how Postgres handles RLS.
There are two possible ways of enforcing RLS with Postgres. Either by using different roles, which is a litle cumbersome as each role has to be defined in the database, or by utilizing the Postgres current_setting() function. For each transaction, the Postgres SET ROLE or SET settingname functionality sets the Role/setting value. If RLS is enabled, Postgres only allows queries (e.g. CRUD) if, depending on the approach, the settingname or a role is set, and additionally, only affects rows related to the specific tenant.
A good article to learn more regarding Postgres RLS is this AWS blog post. But be advised: their approach is a little more complex regarding the database schema though.
NestJS implementation
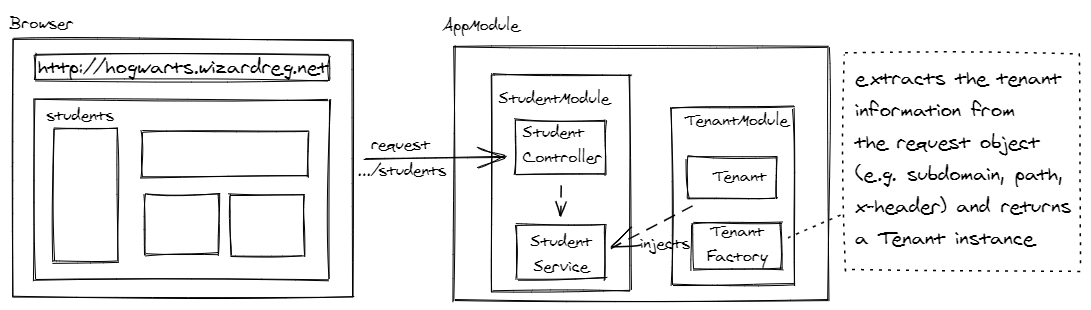
Please note: The approach in this article uses a factory provider to determine and provide the tenant. That factory depends on nests requests object which is REQUEST scoped by default. Due to the architecture of NestJS, the scope bubbles through the whole injection chain. Thus, all instances depending on the tenant (e.g. the controller that includes a service which has Tenant injected) would inherit that scope. This is a performance issue and should be mitigated in production. See my follow-up post on multi-tenancy using namespaces with NestJS async-hooks.
Take a glimpse at the example projects Github repository. If you want to follow along with the provided example project, please make sure you have docker & docker-compose installed. That’s required for the provided Postgres DB container. The project includes everything this post covers.
During the next steps, I will explain all the steps and apply them manually. Some of the steps are automated in the projects (e.g. database initialization of the specific user and RLS configuration) - just make sure you throw away all your Postgres volumes before running docker-compose. Otherwise, the DB won’t be initialized correctly.
Finally, the practical part!
Before we start with the NestJS code, our Postgres database requires some configuration. The Postgres superuser owns the BYPASSRLS flag by default. And it is a best practice not to use the superuser anyways. Therefore, we create a database, a user and grant privileges to that user on the database we created.
$ psql -h localhost -d database
// password:  wizreg
wizreg=>$ CREATE DATABASE wizreg;
wizreg=>$ CREATE USER wizreg WITH LOGIN PASSWORD 'wizreg';
wizreg=>$ GRANT ALL PRIVILEGES ON DATABASE wizreg to wizreg;
WITH LOGIN PASSWORD allows the user to login, and sets its password
GRANT ALL PRIVILEGES allows queries like SELECT, INSERT, UPDATE..
Having this set up, let’s head on to the RLS specific configuration.
We need a policy that links the value stored at wizreg.current_tenant to the tenant column on the student table.
wizreg=>$ CREATE POLICY tenant_isolation_policy ON student
        USING (tenant_id = current_setting('wizreg.current_tenant')::int);
While we’re at it, let’s enable and enforce RLS on the student table, too.
wizreg=>$ ALTER TABLE student ENABLE ROW LEVEL SECURITY;
wizreg=>$ ALTER TABLE student FORCE ROW LEVEL SECURITY;
In addition to the defined schema in the Student entity, the column tenant_id is required, here’s an example:
import { Column, Entity, PrimaryGeneratedColumn } from 'typeorm';

@Entity()
export class Student {
  @PrimaryGeneratedColumn()
  id: number;

  @Column()
  name: string

  @Column({
    type: "int",
    default: () => "current_setting('wizreg.current_tenant')::int",
  })
  tenant_id: number;
}
As you can see, we’re setting the default value of tenant_id to the value of the wizreg.current_tenant setting variable. With that trick, we do not need to take care of the tenant_id column at all in our code. Except for setting the value in each transaction, obviously :).
But before we’ll get to those transactions, let’s take a look at the Tenant factory in the tenant module.
const tenantFactoryFromRequest = {
  provide: "TENANT",
  scope: Scope.REQUEST,

  useFactory: (req, tenantService) => {
    const tenant: Tenant = tenantService.getTenantByName(
      req.headers.host.split(".")[0]
    );

    return tenant;
  },
  inject: [REQUEST, TenantService],
};

@Global()
@Module({
  imports: [HttpModule],
    providers: [TenantService, tenantFactoryFromRequest],
  exports: ["TENANT"],
})
export class TenantModule {}
The factory provider injects the TenantService as well as the REQUEST object which contains all information on the request. Using this information, we can extract a tenant identifier and request the specific tenant from the TenantService. To keep it simple, our service returns hardcoded tenant id’s for the exemplary tenant names Hogwarts and Castelobruxo.
Now, as we export TENANT in the TenantModule, we can inject it everywhere in our project. Like so in the TenantService.
[..]
constructor(@Inject('TENANT') tenant: string) {
    this.tenants['hogwarts'] = new Tenant('hogwarts', 1);
    this.tenants['castelobruxo'] = new Tenant('castelobruxo', 2);

    if (this.tenants[tenant]) {
      this.tenant = this.tenants[tenant];
    } else {
      throw Error('Unknown tenant.');
    }
  }
[..]
Having the tenant at this location brings us to the actual data storage/access. The approach is the same for all Service methods:
TenantService has a generalized method to set the tenant on a connection via the QueryRunner or the current Repository. The utilization of SET LOCAL ensures that the current tenant is only scoped to the current transaction. This mitigates possible side-effects such as queries picking up the tenant from other queries or transactions.
async setCurrentTenantOnRepository<T>(
  repository: Repository<T>,
): Promise<void> {
  repository.query(
    `SET LOCAL wizreg.current_tenant=${this.tenant.tenantId};`,
    [],
  );
}

public async setCurrentTenantOnQuerryRunner(
  queryRunner: QueryRunner,
): Promise<void> {
  queryRunner.query(
    `SET LOCAL wizreg.current_tenant=${this.tenant.tenantId};`,
    [],
  );
}
async findAll(): Promise<Student[]> {
  return await this.connection.transaction(async (manager) => {
    const repo = manager.getRepository(Student);
    await this.tenantService.setCurrentTenantOnRepository(repo);

    return repo.find();
  });
}
And that’s it. Now, all data is stored and accessed depending on the tenant.
To validate, depending on your OS, it might be necessary to add prefixes to your hosts configuration, so that subdomains work on localhost.
Open /etc/hosts/
$ sudo nano /etc/hosts
and add this line:
127.0.0.1 hogwarts.localhost castelobruxo.localhost
Now, add some example data using the create endpoint:
For Tenant 1:
$ curl --header "Content-Type: application/json"  --data '{"name": "Harry Potter"}' hogwarts.localhost:3000/students/
$ curl --header "Content-Type: application/json"  --data '{"name": "Hermine Granger"}' hogwarts.localhost:3000/students/

For Tenant 2:
$ curl --header "Content-Type: application/json"  --data '{"name": "Alanza Alves"}' castelobruxo.localhost:3000/students/
Let’s see what we get as a response if we request all students from both tenants:
$ curl  hogwarts.localhost:3000/students/
[{"name":"Harry Potter","tenant_id":1},{"name":"Hermine Granger","tenant_id":1}]

$ curl castelobruxo.localhost:3000/students/
[{"name":"Alanza Alves","tenant_id":2}
Done! Looks like our tenant differentiation works! I hope this post is helpful, feel free to get in touch if you have any questions :) The full project ist available at Github
Some things to consider for production
- Don’t use the factory approach, consider using namespacing as suggested in this post - However, even that approach is not 100% recommended for production since it has been a experimental issue for a fair amount of Node versions now.
- Use unique identifiers instead of names for tenant identification (e.g x-key headers, path over subdomain)
Use migrations: there currently is a bug in typeorm which I explain and provide a workaround in …- You can now set the tenantid by setting the default value of the tenant column e.g.current_setting('wizreg.current_tenant')- Use a specific table for tenants and a foreign key reference in the data tables